 |
|
|
HOW
DO YOU USE IT?
HOW
TO READ AND MAKE ADJUSTMENTS?
TYPES
OF SHOTS?
![]()
|
|
|
|
|
To begin the player should start by setting his/her shooting position at the free throw line. The player should insure proper positioning and alignment of the footwork, lower body, upper body, and head position. (A detailed outlined of these positions is included in the fundamentals of shooting section at end of TSC video received with your purchase) PLEASE NOTE: A set shooting position, such as the free throw line, helps the shooter isolate and focus on the specific development of shooting release, rotation, rhythm, and arch while eliminating other shooting components that the shooter does not need to focus his/her attention on at this time. |
|
|
Once the body position is set, the player should place his/her shooting hand into the proper shooting hand position as outlined on the ball in the white starting segment. |
|
|
With the shooting hand in position the player should then place his/her off-hand in the proper off-hand position on the side of the basketball. With both hands set the player should position the arms and hands in the proper shot prep position with the Shooting Coach in hand. |
|
|
To start the player should execute the proper shooting motion taking "The Shooting Coach from the shot prep position to the final release of the basketball to the basket. |
|
|
The player should execute the full shooting rhythm, holding his/her follow-through, while continuing to stay focused on the front lip of the rim until the ball goes through the net. PLEASE NOTE: For the most effective use of the TSC a player should incorporate the help of a friend, parent, coach, and/or utilize a video camera to assist in the reading of the flight of the basketball. This assistance will help eliminate the tendency of a player to watch the flight of the ball and help the player focus more on the front lip of the rim as he/she executes their shooting rhythm while working to develop better shot release & rotation. |
|
|
After the ball goes through the net and hits the floor the player should retrieve the ball and reposition himself/herself at the free throw line. With the ball in hand the player should make any adjustments deemed necessary based on the information gathered by "The Shooting Coach" and relayed by the coach, friend, or parent and repeat the process while continuing to work on the development of proper shot release and rotation. If a player is using a video camera to evaluate and develop his/her shot the player should film his/her shots from half court and the sideline. Players should shoot fifteen to twenty shots from each camera angle. After each angle has been filmed the player should rewind the tape and review while evaluating correct and incorrect release and rotation. While reviewing players should read, identify, and note current shot release and rotations patterns. Players should note shooting hand, off hand, arm, head, and body position, flight of the ball, rotation, release, and any other specifics that might assist in the development a true shooters shot release and rotation. After correct and incorrect components have been identified players should make the necessary adjustments and repeat the shooting process while continuing to focus on the development of consistent release and rotation of the basketball with every release of the ball. |
|
COMPONENTS |
|
|
|
RELEASE STRIPE  identify to the shooter current strengths and flaws with his/her shooting
release.
identify to the shooter current strengths and flaws with his/her shooting
release. |
For a player with a correctly released ball the white release stripe will remain vertical in flight on the way to the basket. A player with improper release will have a ball that has a line that either wobbles or spins sideways. | A shot that wobbles
typically stems from a shot that is released off of the shooting hand with
the added influence of the players off-hand or off-hand thumb to help
drive the ball to the basket. To adjust for the perfect release the
player should work to support the ball with the off-hand without providing
any influence on the shot while working only to drive the basketball to
the basket with the shooting hand. No influence on the ball from
the off-hand will cause the balls white release stripe to fly vertically
in flight and thus yield a ball that is only influenced by the shooting
hand upon release. Note:
A ball that is driven straight will go straight.
A shot that spins sideways is the direct result of a ball that is released off of the inside or outside of the shooting hand. To adjust for the perfect release the player must work to drive the ball off of the index and middle finger of the shooting hand by continually supporting the ball through the shooting motion until the hand snaps over and down with the fingertips coming to rest pointing toward the floor. Players with a sidespin shot must resist the erg to twist the hand through the shooting motion. Consistent practice and execution of proper shooting release while utilizing TSC will yield a shot that is properly released by the shooting hand off of the index and middle finger. |
| RED & YELLOW ROTATION RECTANGLES
The red & yellow rectangles in their current pattern, outlined by the white vertical release
stripe, help make up a solid vertical line. When The Shooting Coach
is released by the shooter the red and yellow rectangles within the solid
vertical line pattern will help the shooter denote correct and/or incorrect
rotation on the basketball and thus identify to the shooter current strengths
and flaws with his/her shooting rotation. |
Correct rotation on the basketball
will cause the red and yellow rectangles to blend; thus turning orange 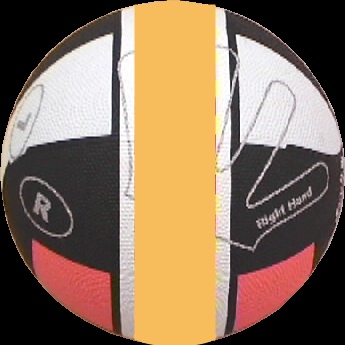 and
signifying a correctly rotating basketball when properly shot. A
player with improper rotation will have a ball that does not rotate in
flight (ie Knuckles). Thus, no rotation, no blend
the red and yellow
rectangle patterns will still be totally visible in flight. and
signifying a correctly rotating basketball when properly shot. A
player with improper rotation will have a ball that does not rotate in
flight (ie Knuckles). Thus, no rotation, no blend
the red and yellow
rectangle patterns will still be totally visible in flight. |
A shot that does not rotate is the direct result of a ball that is released without follow-through. Proper follow-through release, where the ball is driven off of the index and middle fingertips of the shooting hand as the shooting hand snaps toward the floor, will produce rotation on the ball. This rotation is known as backspin. Backspin is an essential component of a shooters shot. Proper backspin softens the shot and gives the shooter touch with every release of the ball. Consistent practice and execution of proper shooting release with follow-through will yield a shot that properly rotates and thus produce a vertical line on the ball that blends and turns orange. |
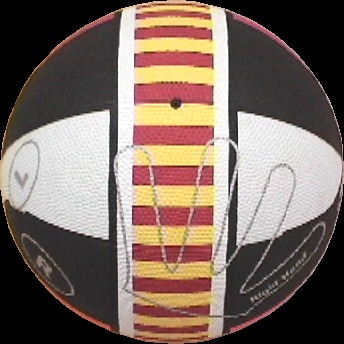 starting
point of the balls rotation when released. starting
point of the balls rotation when released. |
The shooters shooting hand is placed in this white start segment in the properly outlined shooting hand position. As the ball is released off of the shooting hand and rotates in the air on the way to the basket the larger white segment signifies to the player complete rotations in a set arc pattern. NOTE: Pure shooters get two to two and half rotations of the basketball from the free throw line to the basket. On average the ball will rotate one quarter turn about every one and half to two feet. | A shot that does not yield the desired complete rotations is the direct result of a ball that is released without proper follow-through. Proper follow-through release, where the ball is driven off of the index and middle fingertips of the shooting hand as the shooting hand snaps toward the floor, will produce backspin rotation on the ball. Backspin will cause the ball to rotate in flight. A good shooter will complete one full rotation with the white segment start point facing the shooter as the ball reaches the peak of the shooters arch from the free throw line. A great shooter will complete one and a quarter rotations with the white segment start point facing the floor and the pink rotation quad panel facing the shooter as the ball reaches the peak of the shooters arch from the free throw line. Consistent practice and execution of proper shooting release with follow-through will yield a shot that properly rotates and thus produce a ball that yields complete rotations in a set arc pattern. |
|
WHITE,
The white, pink, yellow, and orange quad panels signifies to the shooter measuring marks to help measure the balls rotation in a set arc pattern. 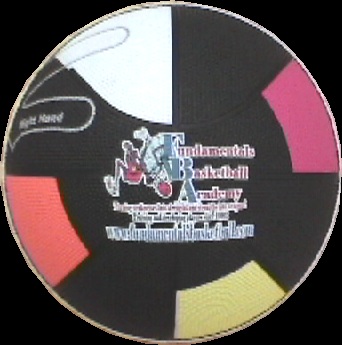 |
The shooters shooting hand is placed in the large white start quad segment. As the ball is shot and rotates in the air on the way to the basket the shooter can identify, by the colored quad panels, how many full and partial rotations the ball makes from a given shooting position to the point where the ball enters the basket. These counted rotations will help the player as they work to develop greater rotation on the basketball as the ball is released out of the shooting hand and off the shooting hand fingertips. NOTE: Pure shooters get two to two and half rotations of the basketball from the free throw line to the basket. Full rotations can be measured by the white segment start point while partial rotations can be measured by the pink, yellow, and orange quad panels. |
A shot that does not yield the proper rotation is the direct result of a ball that is released without proper follow-through. Proper follow-through release, where the ball is driven off of the index and middle fingertips of the shooting hand as the shooting hand snaps toward the floor, will produce backspin rotation on the ball. Backspin will cause the ball to rotate in flight. A good shooter will complete two full rotations with the white segment start point facing the shooter as the ball reaches the basket. A great shooter will complete two and a half rotations with the yellow rotation quad panel facing the shooter as the ball reaches basket from the free throw line. Consistent practice and execution of proper shooting release with follow-through will yield a shot that properly rotates and thus produce a ball that yields proper shooting rotation. |
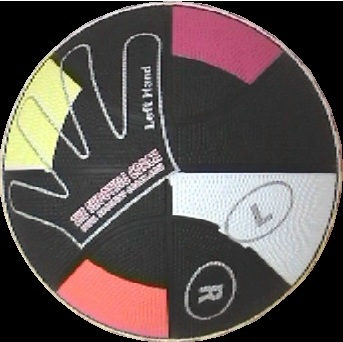 |
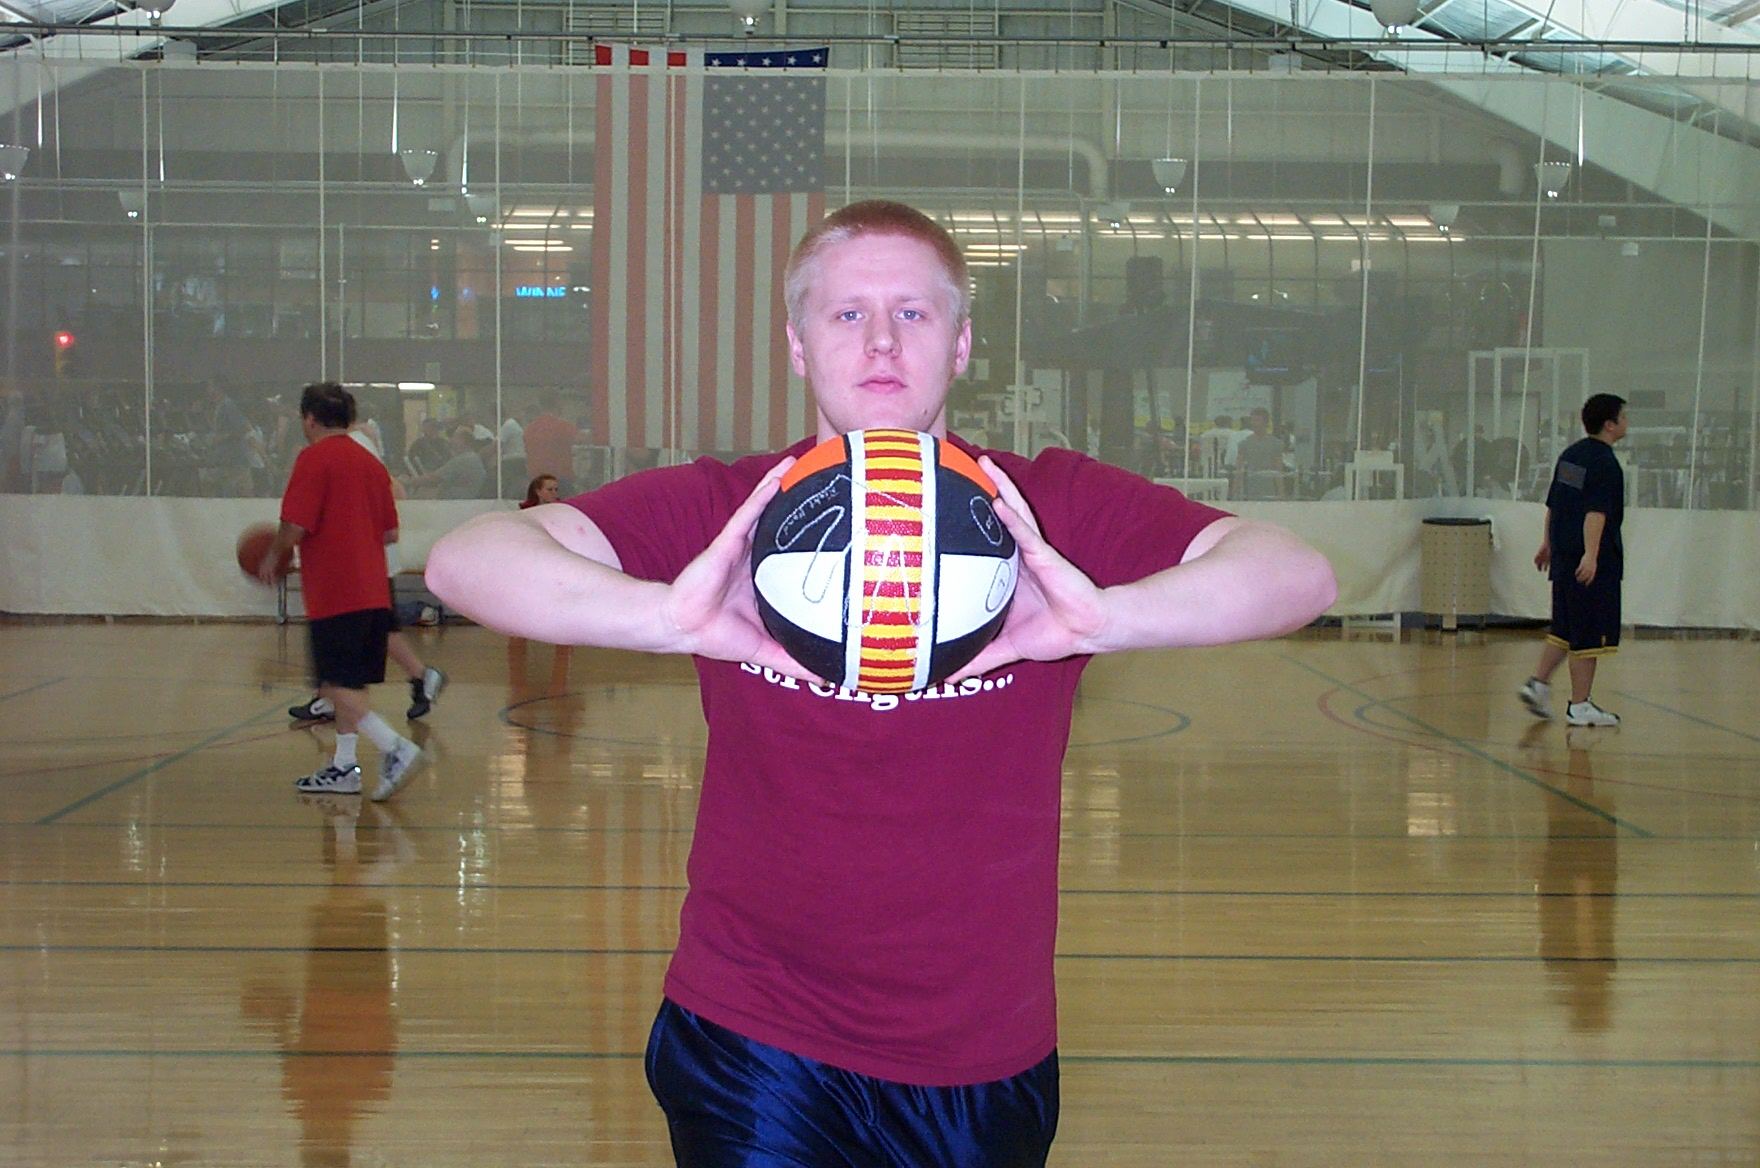
The hand positions are correctly outlined on the basketball so shooters know where to place specific components of the hand. |
|
|
|
As the ball is driven down by the thumbs and then extended forward off of the index and middle fingertips of both hands simultaneously the ball will produce backspin. A Shooting Coach ball properly released simultaneously off of the index and middle fingertips of each hand with the thumbs driving the ball downward into a back spin motion will produce a ball that maintains a vertical line and a line that blends and turns orange. |
 |
|
|
|
|
|
|
|
|
|
|
|
|
|
|
|
|
|
|
This page last updated on January
18, 2007
Copyright © 1999-2007 Troy
Sowders/Fundamentals Basketball Academy/Covenant Enterprises.
All rights reserved.